Editor: Lough Belshade (Belshade Buttress) | |
What would you like to do today? | |
| < | |
Crag Profile: Lough Belshade (Belshade Buttress) |
|||
Details of the crag can be reviewed below. Editing links are present on all routes and inter-route notes |
|||
|
|
|||
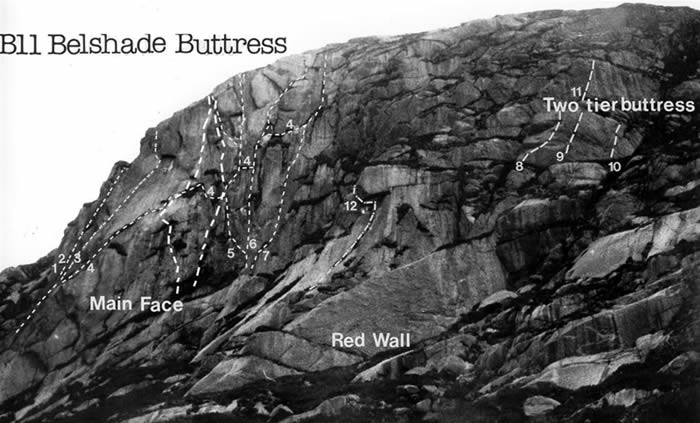
Directions: The crags surrounding Lough Belshade in the centre of the Blue Stack Mts provide excellent climbing in beautiful surroundings. The routes are, almost without exception, on sound granite and well spread across the grades although the long routes on the main face of Belshade Buttress are all HVS and above. There is still plenty of scope for development. Friends are almost essential for protection on most routes. After passing through Barnesmore Gap on the Ballybofey/DOnegal Town Road, look for signs on the right for Lough Eske. Drive around the lake in an anti-clockwise direction until, at the top of a steep hill, a wooden walker points the way down a narrow road to the right (Edergole) The narrow road leads to a small farmyard where cars can be parked. From here a way marked path leads up the valley passing (out of sight) the Doonan Waterfall which is well worth the short detour (50m) to the right to see. The river, and the marker posts are followed until the first major river junction, when a stream descends from Lough Belshade to the left. Follow this stream to arrive at the lake shore. Follow the lake shore to the right to arrive at a small beach at the northern end of the lake, directly below the crags. About 1.5 hours from the road. At the beach there is an excellent campsite and not far away, a good dry bivi stone. From the campsite the crags are, from left to right: Belshade Buttress - by far the largest and containing very fine routes up to 90m in length. Two Tier Buttress on the right flank, consists of two short walls each characterised by a diagonal crack line running up its centre from left to right. Red Wall - below and slightly left of Two-Tier Buttress. This crag is a smooth rightwards facing slab giving fine climbing with no protection. Beyond this is a steep grass and rock outcrops through which descent can be made from the top of the main crag. To the right again is a stream and then a group of three crags one above the other. These are, from the bottom to the top, Blaeberry Crag, The High Crag and last of all The Very High Crag. All provide good one pitch routes on clean rock. OS Grid Reference: G975901 Click here to view location in Google Maps |
|||
01 - More Snakes than Ladders
*
 VS 4c
VS 4cLength: 84m W Brown-Kerr, D Kilpatrick, D Stelfox (25/3/84) VS.4b, 4c, 4b Deep crack and corner system left of Byzantium at the left side of the South Buttress, left of the main face.
The start of this route as well as Byzantium, Classical Revival and Mystery Tour are all most pleasantly reached by climbing up the long narrow slab tongue below the left hand corner of the main face (V.Diff). Directly above the top of this, is a clean slab flanked
by two grassy bays. Start at the arete on the left of this slab.
View Route Edit Route Upload a new photo for this route | |||
02 - Byzantium
*
*
 VS 4c
VS 4cLength: 122m F Winder, P Hill (2/8/54) VS.4c, 4c, 4c, 4a, 4b, Start: The route takes a line up the buttress of rock bounding the left side of the main face. The route starts at the top of the slab tongue described above. The lower section gives some very good climbing and has become steadily cleaner (and harder) over the years, but the upper part is rather rambling.
View Route Edit Route Upload a new photo for this route | |||
03 - Classical Revival
*
*
*
HVS 5aLength: 82m D Stelfox, U MacPherson, I Rea (4/4/81) HVS, 4c,5a,4c.
This route takes the obvious curving ramp leading up to a large overhang at the left hand side of the face, providing two excellent pitches in a very impressive situation.
Start: as for Byzantium.
View Route Edit Route Upload a new photo for this route | |||
04 - MysteryTour
*
*
E1 5bLength: 125m D Stelfox, W Brown-Kerr (Alt leads) (10/7/83) (Pitches 2 and 2 previously climbed by R Greene, D. St E1.4b, 4c, 4c, 5b, 5a, 4c Start as for Byzantium.
This is a rising traverse of the crag from left to right.
View Route Edit Route Upload a new photo for this route | |||
05 - Lest We Forget
*
*
HVS 5aLength: 75m D Stelfox, I Rea (1982) HVS.4c, 4c, 5a
A very enjoyable route taking more or less a direct line up the centre of the crag.
Start: To the right of the slab tongue below Byzantium, a long sloping heather ledge runs right' across the bottom of the Main Face. Scramble up this to its upper right hand end at a prominent corner. About 8m left of this corner a ramp leads leftwards. Start at the foot of this.
View Route Edit Route Upload a new photo for this route | |||
06 - Act of Destruction
*
*
*
E3 6aLength: 75m D Stelfox, D McNiff (2.9.B9) (2 points of aid) FFA. D 0'Sullivan, R Fenlon (5/91) E3.5b, 6a
Two excellent pitches, for which superlatives don't suffice, up the centre of the crag, originally featuring an `entertaining traverse on pegs' but now going free. Start at the foot of Lest We Forget.
View Route Edit Route Upload a new photo for this route | |||
07 - Taken at the Flood
*
*
E1 5bLength: 80m D Stelfox, D Somers (3/5/88) E1 Sb, 5b Another top quality line which now makes the alternative finish to Lest we Forget part of an
independent route. Start 5m left of the start of Lest we Forget.
View Route Edit Route Upload a new photo for this route | |||
08 - Midgesummer Nightmare
*
*
*
E1 5bLength: 80m D Stelfox, W Brown-Kerr (9/7/83) E1.5b, 5b, 4c This route takes a direct line up the crag between Lest we Forget and Land of Hearts Desire.
Start: As for Lest we Forget.
View Route Edit Route Upload a new photo for this route | |||
09 - Land of Hearts Desire
*
*
*
 HVS 5a
Length: 83m I Rea, D Stelfox (10/81) HVS.5a, 5a, 5a, 4c This route gives sustained good quality climbing and takes the prominent corner system up the right hand side of the Main Face.
Start: As for Lest we Forget. Left of the corner at the top of the heather ramp.
View Route Edit Route Upload a new photo for this route | |||
11 - Farewell Little Mohawk
No length recorded K McGee, P Tinney. 01/05/21 5b/5c. 52m -A long wandering pitch
so be careful of rope drag. This takes the crack on the right edge of
a leftward curving overhang which is located directly behind the tree
at the rock step on the main grassy ramp. Climb the wall to a good
stance then follow the rightward curving crack/flakes until a delicate
move right leads to a stance below the overhang. Traverse along the
thin horizontal crack leading from the top right of the overhang into
the next corner. Climb this to the top and then continue up the easy
corner crack and slab which leads up and right. Belay at the flake at
the bottom of the main slab.
5a/b. 25m. From
the flake follow a line of small holds across the slab to reach the
Classical Revival crack. Climb this and then hand traverse with
increasing difficulty along the first crack which leads across the
slab to the belay ledge below the overhang.
5c. 22m Climb the
corner to the right of the overhang. View Route Edit Route Upload a new photo for this route | |||