Editor: Poisoned Glen (West Buttress) | |
What would you like to do today? | |
| < | |
Crag Profile: Poisoned Glen (West Buttress) |
|||
Details of the crag can be reviewed below. Editing links are present on all routes and inter-route notes |
|||
|
|
|||
Directions: See guide book OS Grid Reference: B939165 Click here to view location in Google Maps |
|||
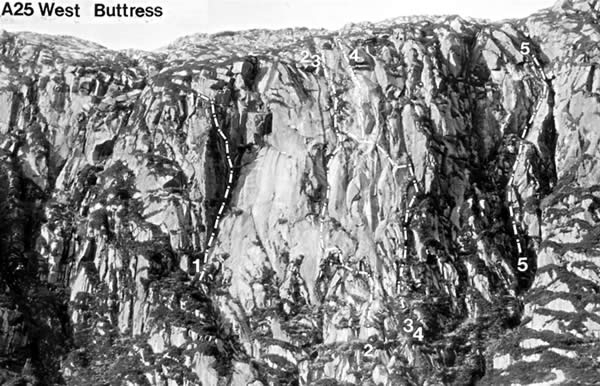
| The three earliest routes here follow the three diedre of the West Buttress. To the left of the first (left hand) diedre is a black gully, and left again is a small buttress containing Piglet's Crack. |
|||
|
Edit note
Upload a new photo for this note |
|||
1 - Piglet's Crack
*
VS Length: 24m R. Wathen and B.E.H. Maden 14/04/1958 To the left of the first diedre (reading left to right) on the West Buttress is a black gully, left of this is a small buttress. Climb the 24 m crack. Better desription and its descent route/method to be checked. Described as 'a delectable one-pitch crack' in the IMC Journal, it was footnote in the 85 guide and left out of the 2002 guide. Hence 1 star - until informed otherwise. This also saves others submitting it as a new route. Ronnie Wathen (a Trinity Uni climber) got one of the earliest repeats of Spillikin, he also provided The Glen's text for the 62 guide. So the route shouldn't be a pushover - when you eventually find it. View Route Edit Route Upload a new photo for this route | |||
| At the left hand end of the West Buttress is the first, enormous, diedre; here lies Gollicker. |
|||
|
Edit note
Upload a new photo for this note |
|||
2 - Golliker
Length: 150m H. Drasdo, H.J. Thornton (22/8/56) The route follows the enormous diedre on the left of the buttress. Scramble up from the left to the base of the diedre. Climb groove with two or three awkward moves to reach where the groove steepens into a chimney about 45m from the base of the diedre. Follow the chimney crack to where it runs out in to an overlap. Move out left, then back right to reach ridge above. A further pitch of scrambling leads to the top. Heavily vegetated and unpleasant route - cleaning would help restore it. View Route Edit Route Upload a new photo for this route | |||
| The central diedre. |
|||
|
Edit note
Upload a new photo for this note |
|||
8 - Belladonna
 E3 5c
E3 5cLength: 220m K McGee, P Tinney. 10/06/18 Approach either up the Glen from the Dunlewey side or from the Lough Barra side. Both have a similar walk in time but an abseil allows the first approach pitch to be skipped. Park at 958 146 along the R254 before Lough Barra. Stay to the right of Srubhanavarna and the basin until you can cross between the final two lakes to gain the rib leading upwards. Once on the crest, continue in a NW direction to the obvious wall, follow the narrow gully(941 164) down the hill and continue along the slab on the right which leads to an ab platform( sling on a big flake and WC friends 4 and 1 in a tapering crack). 95m abseil to the start of pitch 4 and a 50m ab to the start of pitch 2. The gear is mainly small wires and cams(BD .4 to micro). The first pitch was climbed unroped so the length is only an approximation. 1) 60m (3c) Start at the lowest clean slab at the bottom left of the West Buttress. Climb up the easy crack on its right edge. Continue over a step to gain the next slab, move left and climb the grassy rib until a move can be made to gain to gain the grassy ledge on the right. Move up and right to the short red and black wall. 2) 35m (5a) A few steep moves gain a ledge, move right for 2m and climb the blunt arête(no gear but easy climbing) to the large block. Move left and bridge across to the slab and thin crack, climb this and step right at the top to the grassy ledge. Move right and up the thin crack on the slab to belay below the flake. 3) 21m(5c) Move right along the flake and up the short steep wall. Trend left to the thin seam. Difficult moves lead to better holds and a few metres of easy juggy climbing. 4) 52m(5c)Climb the crack to the overhang and the obvious weakness( as for Nightshade. All pegs have been removed). Follow the thin crackline above the overhang and belay near the top of the slab. 5)52m(4a) Easy but still fun, could be nasty if wet. Climb the remainder of the crack. Bridge up the groove and reach up to a good hold on the block above. Swing across and up this, cross a grassy bridge, gain the slab and continue to the top. View Route Edit Route Upload a new photo for this route | |||
| The next two routes share the same start.Kon Tiki, climbed in 1956, takes a devious line from the base of the right-hand diedre moving leftwards to finish up Nightshade, and involves diagonal abseils and tension traverses. Rah free-climbs the main pitch of Kon Tiki and then follows the obvious groove which Kon Tiki avoids. |
|||
|
Edit note
Upload a new photo for this note |
|||
3 - Nightshade '
*
HVS Length: 155m R.B. Evans, J.A. Austin (Alt. leads), B.A. Fuller (4/8/57) This fine classic route takes the obvious central diedre of the buttress and continues over the overhangs in an almost direct line to the top. Climbed with various amounts of aid over the years, it has been free climbed but which climbers did it first is not known. The climbing is relatively straight-forward but is sensational and well recommended route.
View Route Edit Route Upload a new photo for this route | |||
9 - Micheal
 E2 5b
E2 5bLength: 159m K McGee, I Miller
View Route Edit Route Upload a new photo for this route | |||
| Between the two gullies on the right-hand side of the buttress there are two slabs. This route starts just above the point where the two gullies join, starting with a short chockstone pitch in the left-hand gully. |
|||
|
Edit note
Upload a new photo for this note |
|||
10 - Gaeil Uladh
Length: 172m K McGee, P Tinney. 19/04/19 52m. (4b)Start at the edge of the main slab to the right of
Nightshade. Climb up two short steps and move left around the blunt
arete to a flake (above a small overhang and left facing corner). Move
up the obvious cracks and then gain the wide curving flake crack and
belay just above this.
30m. (5c)A few delicate moves gain the curving crack. Follow this
until it closes below the wall and trend left along the seam where a
few thin moves lead to better holds. Belay on the large ledge above
the corner crack.
45m. (5b)Trend right up the ramp to a steep corner with cracks and
flakes. Climb the slab above for a few meters until a crack on the
right can be reached. Follow this to the top and then move right past
a large flake below the overhang and step down and belay.
45m. (5b)Climb the corner crack through the overhang and continue to
the top past the loose stones on the right to a good belay about 8m up
the heather ledge. View Route Edit Route Upload a new photo for this route | |||
11 - Final Flight
Length: 163m K McGee, K Stewart. 04:09:21 Start as for Gaeil Uladh.
P1. 4c (45m)At the blunt arête,
climb directly instead of moving left to the crack. At the top of this
move right and gain the obvious cleaned groove. Continue to the base
of the main wall (old peg and tat)and belay. P2. 5b (45m) Climb the cracks and belay at a good stance before the crack starts to thin again. P3. 5a/b (25m)Continue up for a few metres and trend right and follow the thin crack that traverses right and then leads up and directly to the bottom of the corner. P4. 5b (48m) As for Gaeil Uladh. View Route Edit Route Upload a new photo for this route | |||
4 - Rah
*
*
*
E2 5cLength: 142m C Torrans. C Sheridan l3/6/78 E2,4a, 5a, 5c, 4a (2 aid pts) Start: 8m left of a prominent square overhang at the right-hand side of the buttress in a small pink gully, about 60m below the foot of the diedre and right of the slab tongue at the start of Nightshade.
View Route Edit Route Upload a new photo for this route | |||
| This climb takes the RHS of a huge flake, to the right of Serial Slabs and right of the deep gash & gully. |
|||
|
Edit note
Upload a new photo for this note |
|||
5 - KonTiki
Length: 140m H. Drasdo, N. Drasdo (Alt leads) (27/8/56) Pitches 1-3 (see Rah's description.) 4.) 27m Up chimney in corner pass stance on right to second chimney. Easier climbing to overhang with good holds and stance below steep corner. Last 9m is in Nightshade Pitch 5. 5) 40m As for Nightshade pitches 6 and 7 to the top. View Route Edit Route Upload a new photo for this route | |||
6 - Serial Slabs
Length: 157m H Drasdo, N Drasdo (9/8/59) l aid point
View Route Edit Route Upload a new photo for this route | |||
7 - Return of the Eagles
 HVS 5a
Length: 50m Martin McGuigan, Alan Tees (alt leads) Mark McGuigan This climb takes the RHS.of a huge flake to the right of Serial Slabs, and right of the deep gash & gully. A rising approach is made leftwards, to reach a steep heather slope below ahuge perched flake, right of vertical gully. Start in obvious cleaned 75 degree corner, & climb it until forced up left into another higher vertical corner. Climb it (peg in situe) to exit onto slab (crux). Move left along groove,& delicately up thin crack to large ledge & belay. Continue up left on offwidth(good holds) until it becomes overhanging, forming the edge of a flake. Excellent hidden jugs lead to exposed stance on top of flake. Step off right hand edge of flake & climb 20m meandering crack up the headwall to vegetated ledge. Short wall & steep mixed ground to the top. View Route Edit Route Upload a new photo for this route | |||