Glenagivne Wall (The Music House) |
|||
Glenagivne Wall |
|||
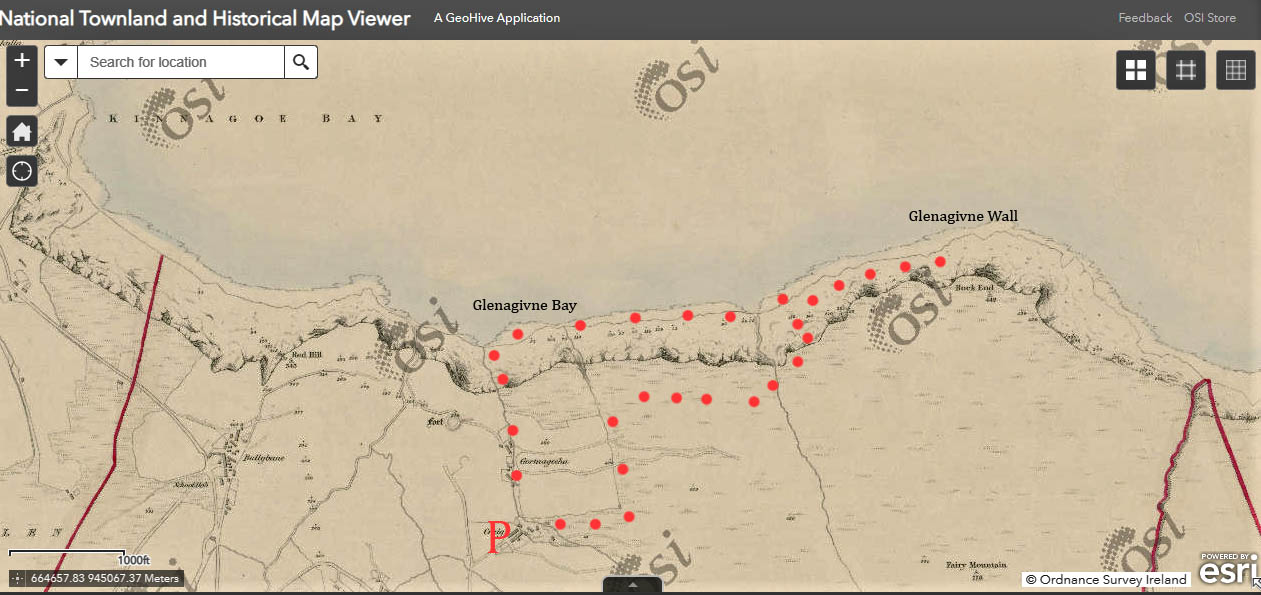
Directions: This impressive wall rises in three tiers from just above sea level to the summit of Rock End at over 400m at the northern termination of Glenane Hill. Steep multi-cracked walls are capped by ‘The Beak’, a prominent spike at its highest point. The lowest tier, (The Music House) is probably the most impressive and attractive, and this is separated from the upper cliffs by a thin heathery terrace. There is a cave/alcove by the beginning of the terrace, should shelter be required ( and a shelter at the bottom under some boulders too). The middle wall, above, is also seamed with cracks which run through 2 bulges for most of its length. The upper wall is slabby, has a large prow, and the prominent ‘Beak’ at the top. Approach Turn off the Moville to Gleneely Road towards Kinnego bay, continue along the hilly coastal road east and park at Craig . Best approach is a coastal boulder hop from Glenagivne Beach (much easier when the tide is out). Park on a lane below some holiday cottages gr 639 454, walk further down the lane to a bend, and follow a path left, down through some woods, exiting by the river onto the stunning Glenagivne Beach. Walk to the east end of the beach and do a coastal traverse from there. Outside the growing season, there is an alternative route from Craig, use the rising track through 2 gates across Mr Anthony McHendry’s land, which is probably marginally shorter. Anthony is of advanced years, but still good for a yarn, and very hospitable, so call and ask at his house, just left of the gate at Gr 640 454 From the holiday cottages above Glenagivne bay, continue a short distance up the hill, and take the left of two side- by- side lanes, one of which is not marked on the OS map (first asking permission, see above). At the end of the lane is another gate, and beyond is a track running left, down towards the sea. Take this and follow it as it bends to the right, until you come to a swampy area, from where a stream emanates. The ground to the left is wet, tussocky and rushy, but there are sheep paths through it which descend to a fence at the top of the bens. Follow the fence to the right (east) to a grassy spur, and take a steep sheep track down the slopes to just above the sea. Five minutes further east will lead to Glenagivne Wall. This approach is about 40 minutes from the car. OS Grid Reference: Gr 650 459 Click here to view location in Google Maps |
|||
 S 4a
S 4aLength: 15m Alan Tees,Geoff Thomas The leftmost crack line, on the left wall. Start on big horizontal
holds, overcome a bulge with a big jug, and climb the crack. From
the top, a veggie scramble rightwards, leads up to a corner above
Caruso where there are pegs etc for an abseil. Alternatively clip
the line to traverse around the corner and across the terrace..
|
|||
Length: 20m Geoff Thomas, Neil Mahone 23/08/21 On the left wall of the Music House, this takes the crackline, about
one metre to the left of Ginger Lady. Well protected with sound
rock. Escape either rightwards across the terrace, or abseil.
|
|||
 HS 4b
HS 4bLength: 25m Alan Tees, Geoff Thomas 12/08/21 This takes the crack and flake just right of centre of the left wall,
and two or three metres left of Caruso. The start is a scramble to
gain the bottom of the crack, climb the crack (crux) move right and
climb to gain the flake, from where it eases. Nice route and grade is
provisional as a bit more cleaning is required, and the second did it
in the rain.
|
|||
 VS 4b
VS 4bLength: 25m Alan Tees, Geoff Thomas 15/07/21 This \' Must do route \' takes the obvious corner left of the lower
wall (left of The Music House). Scramble up to the ledge at the base
of the corner. Layback the corner using biggish cams or hexes for
protection. You will need at least 4, but the rock is reassuringly
grippy.
|
|||
 HVS 5a
Length: 30m Alan Tees, Sean Convery, Eugene Doherty 3/06/21 30m HVS 5a Start just below The Dutchman, and move left past a flake to a ledge. A couple of layback moves required to gain the parallel crackline about a metre left of Dutchman. The crack becomes double, then single again before reaching the ledge. Again, very protectable throughout. |
|||
 HVS 5a
Length: 30m Alan Tees, Sean Convery (alt Leads) Eugene Doherty 3/06/21 Towards the left end of the wall is an obvious crackline going from the bottom straight up the wall to a ledge. Climb it whatever way you can. Sustained, but very well protected throughout with nuts or small cams. A second short pitch can be added from the ledge, over a big flake and short crack to a large vegetated area. Escape options along the vegetated ledge towards Glenagivne. Alan Tees, Sean Convery (alt Leads) Eugene Doherty 3/06/21 |
|||
 HS 4a
HS 4aLength: 25m Alan Tees, Eugene Doherty 18/04/2021 Near the centre of the lower wall is a big flake, with a Y crack
above. Start below the flake and ascend to gain its left hand side.
Continue up the crack, choosing the left hand fork, which leads to a
grassy ledge with a good horizontal belay crack at the back. Escape
is across the exposed heathery terrace to the right, or abseil (or
continue up the next tier of rock)
|
|||
 HVS 5a
Length: 20m Geoff Thomas, Alan Tees 15/07/21 A couple of metres right of Seventy Heaven are twin cracks. Climb
these to a ledge, another ledge just above, and continue up the thin
crack , the crux being at the bottom, but it eases as you go up.
|
|||
 HS 4b
HS 4bLength: 20m Eugene Doherty, Alan Tees 7/07/21 Start at the twin cracks as for Reggae Roots, but move right using
undercut flake, and climb the next groove.
|
|||
 S 4a
S 4aLength: 10m Alan Tees, Bill S Hunt 24/03/22 This takes the diedre just above Ram Stam. Any problems are at the
base, easier above with a taste of the laidback layback. Step over
to the right at the top and exit as for B Minor.
|
|||
Length: 8m Alan Tees, Bill S Hunt 24/03/22 The next groove/diedre right of, and above A Minor.
|
|||
Length: 8m Alan Tees, Eugene Doherty May 21 Climb B Minor to about half height, and make a bold step right onto a quartzite plate to gain an overlap flake which is followed right, to the
terrace. Finishes just below a prominent crack in the wall above.
|
|||
 S 4a
S 4aLength: 20m Alan Tees, Ronan Duddy, April 22 This takes the striking crackline in the centre of the middle tier,
directly above B. Minor. Looks daunting with the two bulges, but
good jugs and protection are a big help, and so it is not quite HS.
Terrific climbing. Exit right along the vege terrace.
|
|||
Length: 15m Alan Tees, Margaret Quinn 13/05/23 This is the crackline on the middle tier, a couple of metres right of
the top of 'Seventy Heaven', left of Argony Piper, (which is a
longer and better line). Only one bulge. Good friction and gear.
|
|||
Length: 20m Alan Tees, George Carleton, Ronan Duddy. April 22 On the middle tier and just left of Oratorio, This takes the obvious
crackline, with good gear and holds helping to surmount the twin
bulges.
|
|||
 HVS 5a
Length: 15m Geoff Thomas, Alan Tees Oct 21 On the middle tier (or intermezzo) there is a prominent crack that
runs through 2 bulges. Traverse the terrace leftwards for a short
distance until you reach a white quartzite vein. Start a metre or so
to the right, and climb a short crack until it meets the quartzite
vein at the first bulge. The first bulge is the crux, and is
surmounted using a small toe hold on the left. Continue over the upper
bulge, without much respite, to where the crack disappears into steep
heather, where there are 2 pegs and a lower off. Excellent climbing.
|
|||
 HS 4b
HS 4bLength: 30m Alan Tees Geoff Thomas. 15/10/21 This takes the arete forming the right edge of the top floor of the
Music house. Not straightforward, and gear harder to find than
anywhere else on the crag, but dramatic stuff, There is a
thread and pillar belay in some rocks just above the top for an abseil
descent. Dont even think about walking off!
|
|||
 HS 4b
HS 4bLength: 100m Alan Tees, Margaret Quinn 13.05.2023 This route combines Seventy Heaven and Dithering Heights, via a choice
of second pitches, Planxty (Severe) Argony Piper (Severe), Self
Isolation Blues (HS) Oratorio VS, or Thin Lizzy HS, (the best option
probably being Argony Piper). Three pitches of excellent climbing,
two of well protected crack climbing, and the third a bit of a shock
to the system being up an exposed arete, relying on small wires. The
first ascent used Planxty, probably not the best option.
|
|||
Crag Number: 225