Crag Number: 215
Malin Head (Bamba's Buttress) |
|||
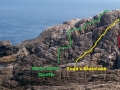
Directions: Descend North West from the Tower on Bamba's Crown. You will soon come to the rock and the great chasm below you. There is a hidden descent ramp/ledge (Millennium Ramp) that will take you half-way down and then down climb (Diff) the remainder from its lowest point. Alternatively, you can down climb the broken ridge on the facing North West (Malin Head Shuffle) and make it as easy or as difficult as you think. OS Grid Reference: C39xxxx Click here to view location in Google Maps |
|||
Length: 120m Columba McLaughlin From the Tower on Bamba's Crown descend North West towards the
western end of the Chasm between the headland and Bamba's Island.
Down climb the ridge taking the line of least resistance. Reclimbing
it you can choose to make it as easy or as difficult as you wish as
there is a wide choice of alternative moves.
|
|||
 D -
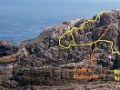
D -Length: 40m Columba McLaughlin 29 July 2016 Descend 'Malin Head Shuffle' to a point before and below the
'Millennium Ramp' and commence the traverse rightwards keeping as
high as possible but always below the 'Millennium Ramp. The full
traverse ends at 'Vader's Corner' and you have multiple exit
choices. Really good friction and awesome views.
|
|||
Length: 30m Columba McLaughlin Start about 20m to the right of 'Malin Head Shuffle'. Climb to
lowest point of the 'Millennium Ramp' and continue up the rock above
to join 'Malin Head Shuffle'.
|
|||
 D -
D -Length: 20m Columba McLaughlin 02/08/2016 Start in a deep pocket beneath the main face about half way between
'Malin Android' and 'Kenobi's Shorty'. Practically straight up
with little deviation. Finish at the 'Millennium Ramp' or cross and
climb the wall to join the end of the 'Malin Head Shuffle'
|
|||
Length: 20m Columba McLaughlin Start about 4m to the right of 'Malin Android' and climb to the
'Millennium Ramp'. You can descend or climb directly the rock above
to join the 'Malin Head Shuffle'
|
|||
Length: 35m Columba McLaughlin This line follows a very defined crack fault to the right of
'Kenobi's Shorty'. It trends leftwards to join the 'Millenium
Ramp' and then directly up the rock above this.
|
|||
Length: 35m Columba McLaughlin Just to the right of 'Light Sabre Cut' there is an obvious eroded
lava dyke. Climb this to the top of the 'Millennium Ramp'. Best
started at its lowest point. Very airy and no safety rail.
|
|||
Length: 35m Columba McLaughlin Start about 3m to the right of 'Yoda's Staircase' and up the face
above. Very exposed and airy.
|
|||
 VD -
VD -Length: 22m Columba McLaughlin 29 July 2016 Traverse on a good ledge to about 5m right of 'Falcon' and close to
the left hand edge of 'Vader's Corner'. Initially a scramble but
soon steepens (short lived). Poor protection and lots of big air. It
can be gained from the lower zawn start of 'Vader's Corner'
(length 33m).
|
|||
 D -
D -Length: 32m Columba McLaughlin 16/7/2016 (A) Airily traverse about 10m right of Falcon to a wide grassy ledge
and an obvious corner. Climb the corner. Some cleaning was carried
out but some loose rock and grass remains. There are alternative
starts. Descend the grassy embankment to the base of the narrow zawn
and (B) a short overhanging wall (not climbed on this visit) OR (C)
climb the obvious fault 1m to the right of the overhang to small ledge
and then to the grassy ledge and up the corner.
|
|||
 D -
D -Length: 32m Columba McLaughlin 16/7/2016 From
the Tower head west along the fence and carefully descend the grass
embankment to the narrow zawn directly beneath the main face of the
buttress. Start in the niche as for Banba's Traverse and climb to
the small grassy ledge and then directly up the corner.
|
|||
 D -
D -Length: 140m Columba McLaughlin 02/08/2016 From the Tower head west along the fence and carefully descend the
grass embankment to the narrow zawn directly beneath the main face of
the buttress. Start as for 'Vaders Corner' and climb to the grassy
ledge directly below the corner. Move left to the start of 'Beam me
up Luke' and climb this for 3 meters and then traverse left keeping
below the 'Millennium Ramp'. Finish up the 'Malin Android' or
continue left and finish up the 'Malin Head Shuffle'. A really
enjoyable outing with good friction. Hand holds are not always always
as positive.
|
|||
| Left of Bamba's buttress, and around the corner, is a small steep
black wall, facing the end of Dunaldragh Island. |
|||
 HS 4a
HS 4aLength: 10m Marty McGuigan, George Carleton 5/05/19 Left of Bamba's Buttress, go around the corner and locate a short
steep black wall facing the east end of Dunaldragh Island. Scramble
down to slanting platform and climb the most obvious line of weakness
towards the seaward end. Steep but the difficulties are short
|
|||
Length: 8m Alan Tees, Alfie Conn 16/06/19 Takes a line up the right hand side of the steep black wall.
|
|||
Length: 10m Alan Tees, Alfie Conn 16/06/19 Start below and left of Blackbird if the sea permits ( otherwise
traverse along the ledge past Blackbird) go around the edge and climb
the twisted corner, with some initial difficulty.
|
|||