Crag Profile: Poisoned Glen (Bearnas Buttress) |
Details of the crag can be reviewed below. Editing links are present on all routes and inter-route notes |
|
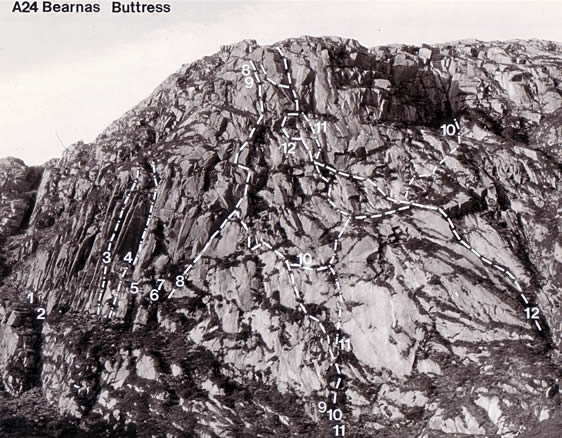
Bearnas Buttress, Poisoned Glen. - 1/. The Outflanker, VS.
2/. Flanker/Unnamed Route, VS.
3/. Saoirse, HVS.
4/. Obituary Corner, HVS A0.
5/. Obituary Column, VS.
6/. Borgia, VS.
7/. Crippin, VS.
8/. Slanting Grooves, VS. Linear B.VS.
10/. Maxfield Fryer Route, VS.
11/. The Direct, HVS.
12/. Route Major, HVS.
|
Directions: This is the largest crag in the glen, (but also probably the most vegetated), situated on the spur to the right of the gap in the back wall of the valley, right of "The Castle." The walk in from Dunlewy or Lough Barra is much the same, about 1.5 hours. This is a very large and serious crag which gets few ascents, therefore route descriptions,& topos should be treated with caution. The first seven routes are all on the left flank of thr crag, and are described in relation to "Obituary Corner"(a clean diedre with a red wall)
OS Grid Reference:
|
VS -
Length: 36m A J Maxfield, H Drasdo, J Williams About 30m left of Obituary Corner is a buttress. The route Flanker starts up the middle of this. About 20m left of this is a wall. The Outflanker climbs this wall and moves left into grooves which are followed to the top. View Route
Edit Route
Upload a new photo for this route |
VS -
Length: 96m H Drasdo, N Drasdo (Alt leads) (12/8/59) A J Maxfield, R Wilde (9/69) Start: Both these routes take the same area of rock - the first buttress left of Obituary Corner - approx. 30m.
- 24m Climb the middle of the buttress to spike belay.
- 30m Follow buttress to a large overhang, with exit on left and V crack above.
-
24m Climb the crack on the right and when above the overhang traverse left onto the main buttress. Follow the buttress for 9m.
-
18m Follow the buttress to the top.
View Route
Edit Route
Upload a new photo for this route |
HVS -
Length: 90m E Goulding, P McDermott (5/68) C Torrans, S Billane FFA Start: This route takes the obvious chimney crack left of Obituary Corner. Start below and to the left of Obituary Corner, and scramble up a gully to a large ledge.
- 24m Climb a chimney groove which is directly below the corner. There is a large mass of vegetation in the centre of the groove and small tree at the top.
- 21 m Climb corner left of Obituary Corner for about 1 m on vegetation. Gain top of some blocks below a small overhang and move directly up crack on left to gain large flake belay on the left.
- 30m Traverse right to foot of chimney, climb this taking left-hand crack at the top, leading to heather ledge.
- 15m Up from belay, tending slightly left after 2m to gain a small corner. Climb this for about a metre until it is possible to move right to a crack. Climb this and belay on heather ledge.
Scramble off by gully on the left.
View Route
Edit Route
Upload a new photo for this route |
*
*
HVS -
Length: 87m P McDermott E Goulding (Alt leads) (5/68) HVS+AO
The clean overhanging corner with the reddish right wall immediately obvious from below. Start: as for Saoisre by scrambling up a gully to a large ledge, below and to the left of the Corner.
- 30m Takes the slab immediately right of the chimney on Pitch 1 of Saoisre. Climb the slabs, trending slightly right and gain heather ledge directly above. Continue to the foot of the corner.
- 30m Climb corner for 9m using cracked right wall to top of a large flake. Climb corner crack, getting steadily harder, using aid (3-4 points). Above the aid, continue up crack using chockstone and holds on walls to ledge and belay.
- 27m The right wall has an obvious traverse line. Gain this (2 aid points used) to reach flake block in right-hand grassy crack. Stand on this and traverse back left (2 aid points used) to gain main groove again. Continue up this groove to top belay. May be more sensible to climb directly up corner crack.
- Traverse left and climb gully to the top, emerging at the same point as Slanting Grooves and Route Major.
View Route
Edit Route
Upload a new photo for this route |
VS -
Length: 150m C Bonnington, N Estcourt |
VS -
Length: 90m A J Maxfield, H Drasdo, J Williams (shared leads) |
VS
Length: 90m A J Maxfield, M Rittman |
VS -
Length: 140m R B Evans, B A Fuller, A Austin (Alt leads), J Ruffe (3/8/57) The next five routes all start from the bottom, front face of the buttress and weave a complicated pattern up the crag often crossing and merging. The main features are the obvious groove line slanting up from left to right and taken by Slanting Grooves; The Field, a huge grass ledge at the top of the initial 75m of slab and below the overhanging band; and the grassy gully at the right-hand side, marking the starting point of Route Major.
Slanting Grooves takes the obvious groove running up the buttress from left to right and then breaking out on the right wall. Start by scrambling up steep grass trending left to corner left of the groove proper. Most parties will want to rope up for this and other starts.
- 25m From the corner move right and up slabby groove to a grassy ledge. Continue up groove to another grassy ledge. Linear B joins at this point.
- 28m The groove steepens and is climbed by wide crack to pedestal. From top of this climb steep crack with hard mantleshelf. Above this is a slabby groove which is delicately climbed to steep grass and ledge.
- 18m Walk to left and ascend steep crack followed by easier climbing to a ledge.
- 30m The tower above is split by a deep V groove which is reached from the left by a steep wall. Climb the groove and belay on grass ledge above.
- 39m Ascend a deep chimney crack, then easier scrambling to a grass ledge at 27m. Walk left on vegetation and up to top. It is possible to avoid pitches 4 and 5 by traversing off left along grass ledges and a short slab (severe).
View Route
Edit Route
Upload a new photo for this route |
VS
Length: 255m H Drasdo, N Drasdo, V Stevenson (11/8/59) The next three routes all start at the same point. Linear B and Maxfield Fryer Route start by taking a fairly direct line up the middle of the buttress towards the Field. Here, Linear B moves left to join the bottom of Pitch 2 of Slanting Grooves. The Maxfield Fryer Route crosses the Field, joins Route Major for Pitch 4, and then moves right again to the top. The Direct starts in the same place but takes a different route also to arrive at the Field. It then goes more or less directly up to join Route Major for pitches 6-9. - 36m Scramble up grass to the left of a very large slab.
- 27m Move onto the rib and follow its right-hand edge until crack leads to grass stance.
- 33m Climb a short slab to another grass ledge. Traverse left to a vegetated crack and up this to where it steepens into a corner. Cross the slab left on undercuts to corner and the start of another crack on the right edge of the slab. Two aid points used to gain holds on slab on the right, which is climbed to grass and heather ledge. The Maxfield Fryer Route moves right at this point.
- 30m Up on grass and heather to a better ledge directly above. Climb wall and continue up vegetated gangway to beneath overhanging corner.
- 21 m Move down to the left, step round rib and ascend groove to grass ledge. Move up left into little slab and step left into groove. Climb up a few feet, then step right and move up onto grass ledge.
- 12m Move awkwardly up short wall into crack between blocks and climb left to the pedestal on Slanting Grooves (Pitch 2).
- 105m As pitches 2-5 of Slanting Grooves.
View Route
Edit Route
Upload a new photo for this route |
VS
Length: 255m A J Maxfield, R Fryer (23/6/59) (2aid pts) - 1) 96m As for Linear B Pitches 1-3.
- 24m Cross to the right and down by right-hand edge of the slabs below. A large flake gives access to a ledge leading to the foot of a fine crack that widens into a chimney at about 4m.
- 24m Climb the crack and chimney to reach the Field.
- 78m Scramble and walk up and across the Field to arrive at the bottom of Pitch 4 of Route Major.
- 9m As Route Major Pitch 4 - Ascend left to foot of slabs.
- 18m Climb wall about 2m right of Route Majors slab. Difficult and unpleasant climbing over walls and grass filled cracks leads to a grass ledge and belay.
- 15m Continue much as before to large grass ledge and easy exit on the right.
View Route
Edit Route
Upload a new photo for this route |
*
HVS
Length: 255m J Williams, H Drasdo (4/69) (Pitches 1-7) HVS (3 aid pts) Start: As for Linear B and Maxfield Fryer Route. - 30m Zig zag up heather strips to belay at foot of a rib.
- 24m Move up on the right of the rib to a big flake and cross to the right hand side of the narrowing recess. Go up and through the bottleneck and then by heather onto grassy shelf.
- 27m Go up by cracks to a heather ledge (top of Pitch 2 of Linear B and Maxfield Fryer Route). Move up and rightwards to a bulge, climbed with one aid point. Move into crack on the right to insecure vegetation and short chimney groove at the left end of overhangs.
- 27m Climb chimney groove and pull out onto heather using 1 aid point. Up heather left of large flake and follow ledge rightwards to foot of heather filled chimney crack. Climb this to bottom left-hand corner of the Field and junction with Maxfield Fryer Route.
- 15m Walk along ledge to right, ascend short step and go up left on heather to large bollard on bottom right of big slab.
- 30m Step left and follow heathery gangway then ascend directly up slab and continue up corner. Surmount final step and move up to thread belay in corner.
- 24m Mount flake, move right and go up heather to the foot of Pitch 6 of Route Major.
- 24m Move right from the bottom of the corner of Route Major and climb a tower, leading out to a belay at the top of Pitch 6 of Route Major.
- 24m As for Route Major pitch 7.
- 15m As for Route Major pitch 8.
- 15m Follow the chimney directly above to the top.
View Route
Edit Route
Upload a new photo for this route |
*
HVS 5a
Length: 243m H Drasdo, E Langmuir, A J Maxfield (10/4/59) HVS,_,_,4a,4a,4c, 4c, 5a, 4a, 4a,
Start: Scramble up the gully to below the rock step, and where an obvious grass tongue comes down the slab on the left.
- 60m Gain this grass tongue and follow it left to a small stance about 6m below a small tree and 12m below an overhang.
- 12m Continue up easily into the corner above.
- 42m Move left to spike. Step up and continue up left on thin traverse line to flake hold giving access to a turf ledge. Continue left, then right to a good stance in a corner.
- 9m Ascend left to foot of slabs (as pitch 5 of Maxfield Fryer Route).
- 42m Traverse across the short slab (usually wet). Move down slightly and continue traversing left to reach the foot of a huge flake, 5m up the wall, above a grass re - -
- 24m Climb crack to left edge of flake. Continue up the corner cracks above until it narrows to disappearing. Using fixed peg swing out across the wall to a good flake. Reach up and left to a peg in below a large block, which is used to swing across to a grassy groove on the left. Continue up to ledge and belay.
- 24m Climb the short wall above (combined tactics or aid for the initial moves) to gain the heather ledge on the right. Move to the right end of this and climb a short wall to ledge. Continue up the wet chimney
above to a large ledge. A further short step leads to a recess and belay. Difficult to arrange protection for second on the initial crux wall.
- 15m Continue up the chimney to a grass ledge running leftwards.
- 15m or 30m Either up the chimney directly above as for The Direct or drop off the left-hand of the ledge onto grass ramp and follow mixed ground to the top.
View Route
Edit Route
Upload a new photo for this route |
VD -
Length: 54m E F Davies, H Drasdo There are two further routes in the area of rock between the end of the main Bearnas Buttress and the start of West Buttress.
High up there is a clean cut chimney. The approach is rather bad scrambling. The route follows the chimney.
View Route
Edit Route
Upload a new photo for this route |
*
VS
Length: 93m A J Maxfield, R Wilde (6/69) Start: To the right of Sluice is a large buttress with two thin grass ledges in its lower half joined by cracks on the left-hand side of the buttress. - 15m Climb onto the lowest grass ledge on the right of the buttress.
- 27m Climb the crack onto the second grass ledge at 5m. Climb the second crack to reach the top of the lower buttress. Step off the top of the buttress across a crack onto a slab with grass tongue on the left. Climb to the end of the tongue and belay.
- 27m Move right into a corner (5m), climb this to gain another slab with a similar grass tongue. Climb up to blocks and belay.
- 24m Move left and climb easier slabs to the top.
View Route
Edit Route
Upload a new photo for this route |