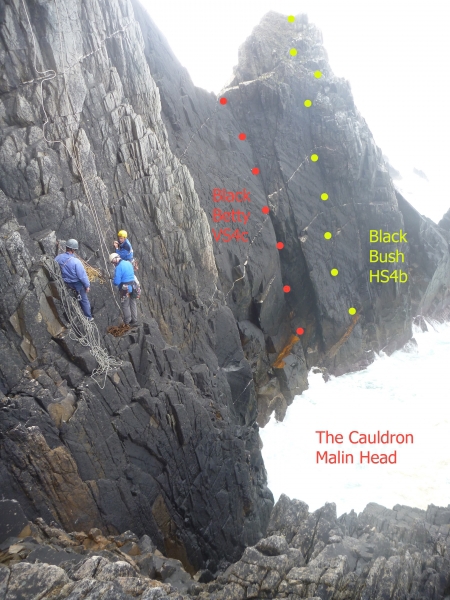
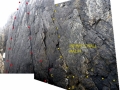
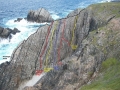
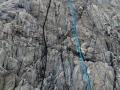
Malin Head (The cauldron) |
|||
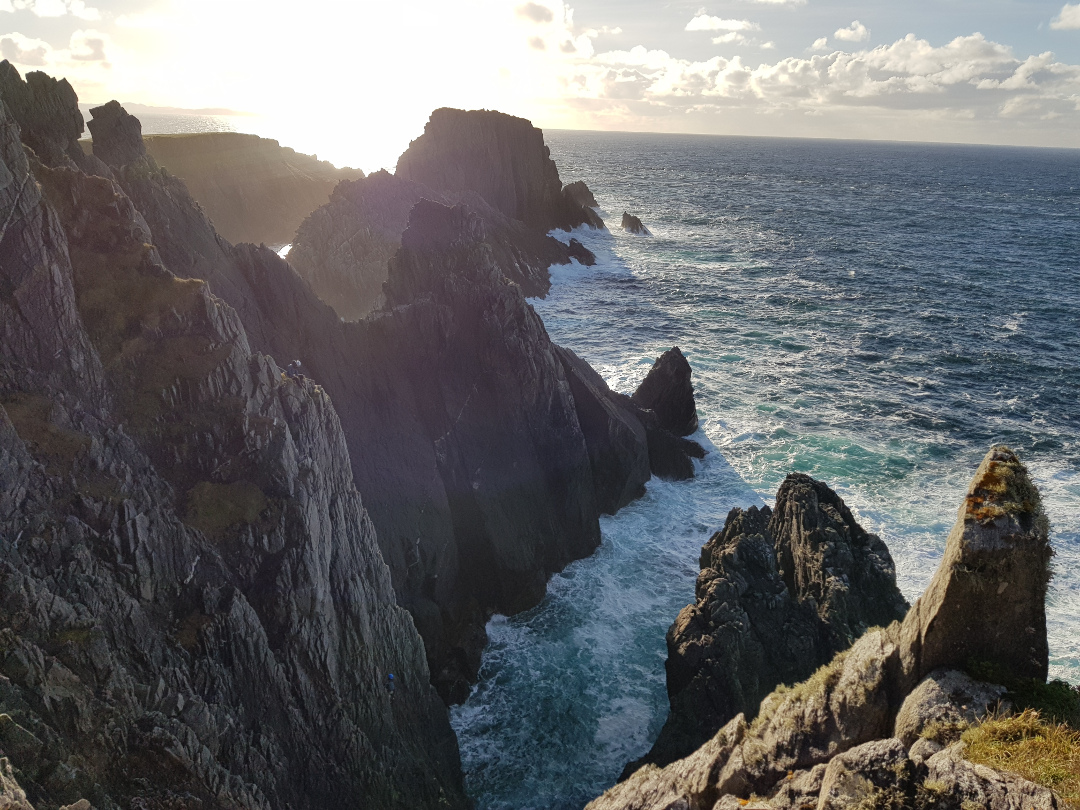
Malin Head (The cauldron) |
|||
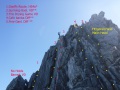
Directions: Approach as for “Sea Area Malin” but park on the right, before the first house on the track. Walk North for about five minutes to the highest part of the cliffs. To the left is the prominent “Reptile Ridge” with “Stelfox Slab” dropping on its North side into the “Cauldron”. Descent for “Stelfox Slab” routes is by abseil from Gr 38670 59333, but the other routes further East can be accessed via a spiky ridge approx 100m east, (as for "Malin Laundry) and a coastal scramble. OS Grid Reference: C386592 Click here to view location in Google Maps |
|||
*
*
 VD -
VD -Length: 140m YHANI party 1935 Descend, next to the ridge, to sea level and the western toe of the ridge.
|
|||
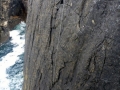
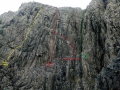
| The next routes require a 50m abseil from the landward end of The
Cutting Edge down to a big ledge in the Cauldron. Care required not
to knock any rocks down on those below, and also beware high seas.
The first route Lizard Line can be followed to the gap in the ridge,
and combined with the last bit of the Cutting Edge, to make one of the
best routes of its grade in the country |
|||
|
|||
Length: 100m Alfie Conn and Trevor Hartley This is a combination of The Prockagh Arete and Lizard Line, which has
evolved into one of the best routes in the country. Abseil down
Dawsons Slab to the big ledge.
1. 55m Climb up the first easy section of Dawson's Diedre (sparse
protection) to where you meet a horizontal quartzite vein. and follow
it right to the low point of Prockagh Ridge, Belay.
2. 35m Airily up the prockagh ridge to the high point.
3. 10m.climb down with care
|
|||
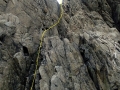
*
*
 VD -
VD -Length: 55m Trevor Hartley and Alfie Conn 10/4/2011 Abseil down Stelfox Slab (See Malin Laundry) from the large individual pinacle (45m) to the large platform on its Eastern edge.An obvious traverse line goes up and right. Follow it to the thin quartz vein and a large flake. Continue upand right over flaky slabs heading for a small corner. When you reach the corner, go up it to the ridge and a possible belay (45ishm). Follow the ridge up to the top.Straightforward climbing with a sparsity of gear in places
|
|||
*
 S 4a
S 4aLength: 50m D Stelfox, R Fenlan, V McAlinden Oct 2007 S 4a Length: 50m D Stelfox, R Fenlan, V McAlinden Oct 2007 Abseil directly down Stelfox Slab, on its East side, to a small ledge well above the sea (usually huge swells) and climb back up the crack and groove, taking the right angled corner to the left at the top, as the lesser of two evils! Nevertheless excellent climbing in a spectacular location More Details (1 Comments)
|
|||
*
 HS 4b
HS 4bLength: 70m Alfie Conn and Trevor Hartley (Alt lead) 3/7/2011 Abseil down Stelfox Slab (See Malin Laundry) from the large individual pinacle (45m) to the large platform on its Eastern edge. There is a large curving corner on the Eastern side of the slab1.40m 4b Climb the corner until a few metres below the capping overhang. Traverse right to belay on "Dawsons Diedre" just below its final chimney2. 30m 4b Traverse left below the overhang and turn it on the left side. Then ascend the slabs above getting quite loose near the top
|
|||
Length: 60m Alan Tees, Chris Boomer 10/06/12 Start up 'Rebel Yell' and after about 8m, move left out onto the wall. A few tricky moves on sound rock and good wires lead up left onto the slab, just at the base of a prominent steep corner ( Ulysses). Continue up, and up the slab, mainly using the corner on the left, til better rock beckons on the arete near the top.
|
|||
Length: 60m Alan Tees, Chris Boomer 10/06/12 Start as for 'Finnegan's Rake' to gain the slab/ramp, but take the prominent deep corner all the way to the arete, just below the top. Sound rock and sensational situations, until the last bit!You can also ab down 'The Rake' and do a hanging belay at the bottom of the corner, in which case the grade will be no more than severe.
|
|||
| The next route is accessed by abseil from the low point on The Cutting
Edge, to a ledge below. |
|||
|
|||
 VS 4c
VS 4cLength: 30m Alan Tees, Alfie Conn 25/03/12 Abseil down to an orange ledge in the "Cauldron" from the lowest part of the "Cutting Edge" ridge (seas permitting). Climb the corner/chimney on bombproof black rock, onto a large flake, and out left, thinly up the wall for a move or two to easier ground. Scramble up the slab above to the top.
|
|||
Length: 40m Alan Tees, Geoff Thomas 4/07/18 Abseil down to a slanting red ledge near sea level, just beyond
\'Black Betty\'. Take care with the abseil as there is some loose
stuff at the top that you could knock down on the person already
below, and the ledge can be slippery!
Climb directly up to the corner on adequate gear, and continue up the
corner ( crux) to the top
|
|||
| The following routes require a traverse on the south side of The
Cutting Edge to access a hidden gully (Conn's Sheugh).A short abseil
is required for all routes excpt possible Infinity and Beyond. |
|||
*
*
 VS 4b
VS 4bLength: 35m Trevor Hartley and Alfie Conn 10/06/2012 Descend to the bottom of the ridge by scrambling down its Southern flank. On its other side, just before the small pinnacle, is an easy angled slab that appears to lie against a steeper face. In fact these two are seperated by a bergshrund like gully. Start at the upper end of the 'shrund.Descend a few metres into the bergshrund until it is possible to use some quartz topped holds to traverse awkwardly left into the crack that contines to the top. (Suggestion: check which crack you are heading for by looking from the easy angled slab beforehand!)The crack is easier than the traverse and there is good protection. The rock is solid until the angle eases at the top.
|
|||
*
VS 4bLength: 20m Marty McGuigan, Alan Tees, 18/08/12 Descend into the Sheugh as for 'Infinity and Beyond' (ab or downclimb at about diff level at the back). At the bottom of the step there is a left trending groove/crack line. Climb it until you can exit right and gain some flakes, and welcome protection. Strenuous steep climbing on great flakes leads to easier, less protected, but still good quality rock above. This was originally thought to be a first ascent, but is actually the second ascent of 'Infinity and Beyond'' but done from the bottom of the sheugh.
|
|||
 HS 4b
HS 4bLength: 20m Alan Tees, Martin McGuigan 8/09/12 Descent into the sheugh, to its highest point below the rock step, and take the obvious left trending groove, before gaining the quartz topped holds, (as for ' Infinity and Below'). Make a long step left, back into the groove, and continue more easily to the top.
|
|||
*
*
*
 VS 4b
VS 4bLength: 25m Martin McGuigan Alan Tees, 8/09/12 10 metres down the sheugh, and left of the Infinity routes, a spectacular crackline splits the highest part of the wall.Due to tide and swell, The first ascent was done from a hanging belay 3-4 metres above the bottom
|
|||
Length: 25m Peter Hughes, Alfie Conn 29/10/16 Start under a shallow gully a few metres to the right of \"Fernenst
the void\" but are the top of the sheugh. Climb into the gully
and then more easily up it until it starts to bend left. Take the
steeper blocks to the top.
|
|||
Length: 15m Marty McGuigan, Alan Tees 28/09/13 About half way down 'Conn's Sheugh' on the left side, bridge up to reach a shallow corner, which is laybacked (or something) to reached a great hold and big ledge. Either climb directly up the crackline behind, or ascend left on jugs (easier) to the top.
|
|||
| The next routes are at the end of the promontary |
|||
Length: 55m Alfie Conn, Margaret Quinn 10 Apr 2016 1. 5m Descend the left side of the ridge to below the col overlooking
the slab. A cracking goes up the wall to a good spike and nut belay.
2. 35m Make as if to ascend the ridge but start to follow a crack on
the dark left side. After a few meters follow the crack in a
descending diatonal line until you reach a large blocky corner. Follow
this up to the ridge and a thread and nut belay. Take care not to
involve the wobbly block in your belay!
3. Ascend to the base of the pinnacle but pass it awkwardly on the
left to finish.
|
|||
Length: 12m Peter Hughes, Alfie Conn 29/10/16 Descend the Southern side of the ridge until an overlap runs up to the
ridge. There is a small 4' high pinnacle at the foot of the ridge.
Start on the left side of the overlap and climb up for a couple of
meters. Step over the overlap and continue up to the ridge. Then
continue as for "Versalgia" or "Cutting edge".
Protection is adequate but the rock is rather brittle.
|
|||
Length: 12m Alfie Conn and Trevor Hartley 10/4/2011 Descend to the foot of the ridge where there is a small stack. Scramble around its southern flank to a ledge on its Western tip(non tidal but may be "exciting" in high seas).Belay hereTraverse left and turn onto the exposed slab. Climb straight up the arete to the top. Occasional side runners may be placed around the arete. If you choose to be brave and avoid these feel free to award yourself a gold star.
|
|||
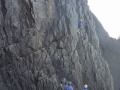
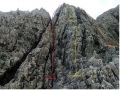
| The following routes are at the back of the Cauldron. They can be
accessed by abseil, but are more commonly approached by descending the
spiky ridge to the east, and traversing back. This is also the
approach for Fitzgerald wall, and the descent ridge itself has
recently had a number of easy routes logged under Prockagh. It had
been used previously as a practise area |
|||
| From the long rocky ridge descend to the left, below Fitzgerald wall, until at the North Eastern end of the sea filledzawn. A flat(ish) platform runs along the top above the water. |
|||
 S 4a
S 4aLength: 60m A.Tees,M.McGuigan, B.Magowan, A.Conn 18/09/11 Descend at the end of the Zawn of Stelfox Slab (the Cauldron), to a non tidal ledge, and a metre right of the Headcase, climb another ,sound ,black, corner, with a good crack for protection. Continue up the obvious line of weakness, being pushed gradually right on a profusion of flat holds (gear not wonderful). When the angle steepens near the top, the gear gets better, as you bridge up either side of a steep crack, to gain the arête. Belay. Continue up the arête with care.
|
|||
 S 4a
S 4aLength: 60m Alan Tees, Bill Magowan, 3/08/11 Descend at the end of the Zawn of Stelfox Slab (the Cauldron), to a non tidal ledge. At the LHS, climb up(step right to sloper) to easier ground, and continue up, with no gear for a spell, to the obvious corner high on the face (gear-Whew!). Above the corner, gain the arête, and continue, with care, to the top. Approx Gr 38673 59356
|
|||
 D -
D -Length: 65m Alfie Conn and Trevor Hartley 12/10/2013 From the extreme left end of the platform descend to sea level and a small wave washed platform. Take the small overhanging crack and follow it to where the crack constricts (Belay)Follow it to where it and protection runs out. Just before this you can go straight up on steeper rock and ultimately grass (The Swiss Alternative VD)The original route carries on by pulling on grass and some dubious rock bits. Take a firm stance belay as far back as your rope allows.This is really a scramble with a seriousness grade
|
|||
Length: 12m Trevor Hartley and Alfie Conn 12/10/2013 About midway along the platform is a cleft in the rock. Abseil down this and then climb out
|
|||
| The next routes are on the other side if the Cauldron and are
therefore much shorter. |
|||
Length: 12m Alan Tees, Bill Magowan 12/10/13 On the promontory bounding the north side of the Cauldron, abb down as for Chimney Sweep, to the platform. At the west end of it, climb up on sound rock, and insert yourself into a deep slot. Doing a passable imitation of an After Eight, or indeed a cheese slice, make upward progress. An interesting exercise in elevation, and not for the morbidly obese (unless you plan to take up residence).
|
|||
 VS 5a
VS 5aLength: 12m Alan Tees, Geoff Thomas, 11/04/11 This takes the fine steep, left trending crack up the centre of the north facing wall, just right of Roxfox. 5a crux to start, no harder than 4b above. More Details (1 Comments)
|
|||
 VS 4b
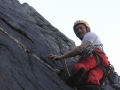
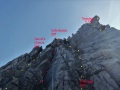
VS 4bLength: 10m Alan Tees, Geoff Thomas 11/04/11 Across the zawn from Stelfox Slab is a promontory split by a narrow gully at Gr 38696 59378. Descend the gully, and Roxfox if the first flake/crack. Strenuous finger climbing eases higher up. Himself, relaxing on the rocks at Malin Head, on Sunday last 16/11/08.
|
|||
Length: 10m Alfie Conn and Anis Proudman 20/9/14 Start opposite \"Roxfox\" ie on the N side of the gap. There is a slab
that lies against the main wall with a crack between the two. Follow
this crack to the top. Better than the name suggests!
|
|||
Length: 20m Geoff Thomas, Alan Tees, 11/04/11 Abseil down from the gap just beyond "Claymore Crack" to a large slanting quartz ledge- only in calm weather!! This route starts in the left corner, and climbs rightwards to the gap, before traversing the wall rightwards again, to gain the right hand arete, which is followed to the top. Dramatic situations!All these 3 routes are worthy of stars, but that should be for others to decide. More Details (2 Comments)
|
|||
| These routes are on the descent ridge ( the east side of which begins
the Malin Laundry area) |
|||
Length: 12m Bill Magowan, Alan Tees, 23/09/12 Use the descent route for Fitzgerald Wall/Malinheadcase etc ( down the spiky ridge to the East), and drop into "Thon Zawn" the narrow creek/inlet to its left (west). At the back of the zawn are a couple of corner/diedres at about Mod/Diff, and lots of scrambling on its east side, but higher up on the right at the back is a slab "Thon Slab" This route takes a nice crack up the right hand side, on good gear and sound rock, although the top third requires some thought re protection placement. Good route, worthy of a star, maybe a bit hard for severe, but a softish touch for HS too! ( and apparently a perfect number)
|
|||
 D -
D -Length: 80m Unknown - Probably Alan Tees and Bill Magowan Used mainly as a descent route for climbs on the Fitzgerald Wall and the Malin Laundry West. GR 38791 59426. Accessing the Prockagh Arête might require a short abseil to protect against an awkwardly angled descent on diabolically loose sharp stones, short grass, loose earth and the deep cut \'Corner Gully\' yawning below your heels to your right. Abseil stakes are in-situ. Easily scramble down the spiky Prockagh arete. Awesome situations on descent. |
|||
 D -
D -Length: 20m Unknown - Probably Alan Tees and Bill Magown A very easy and pleasant route. This is the obvious Gully in the Centre of the Prockagh Wall on its Eastern side and facing towards the Cauldron. Challenging in descent and some nice bridging on ascent. A very obvious V-notch marks its high point on the Prockagh Arête. |
|||
|
D - Length: 20m Unknown - Columba McLaughlin May 2018 This is a spikey triangular area that borders the right ridge of Prockagh Central Gully. It is pleasantly angled and high graded scrambling. Choose your route from a wide variety of optional holds. The rock is razor sharp, thin as if sliced with a knife and some are loose. Care is required. Poor protection but awesome exposed scrambling. |
|||
 D -
D -Length: 22m Columba McLaughlin May 2018 Immediate
right of 'Scramblers' Delight' is an obvious flattish but steep
wall with small nicely spaced footholds. Sparse protection but on good
rock. Very exposed climbing at about Moderate grade.
|
|||
 D -
D -Length: 24m Columba McLaughlin July 2018 About 2 metres to the right of 'Easy Peasy'. Much steeper and with good foot placements. Protection placements are poor. |
|||
 VD -
VD -Length: 24m Columba McLaughlin July 2018 About 2 metres to the right of 'Bowie'. Steep climbing with some good foot placements. Protection placements are poor but there is a good belay on the summit of the Prockagh Arete extending to the Jagged Edge above the wall. |
|||
|
VD - Length: 24m Columba McLaughlin July 2018 About 1 metre
to the right of 'Tomahawk'. Start just right of small overhang. It
more or less goes straight up. Steep climbing on good footholds.
Protection placements are poor. Belay is on the Prockagh Arete and
extended to the jagged edge overlooking the wall.
|
|||
 VD -
VD -Length: 24m Columba McLaughlin June 2018 About 4m to the right of Easy Peasy there is a very steep flattish wall with small holds. Go up on a slightly right trending route. Poor protection and very exposed. |
|||
|
D - Length: 24m Columba McLaughlin May 2018 About 2m to the right there is a series of small left ward trending ledges that provide an easier alternative start to Javelin. |
|||
 D -
D -Length: 20m Unknown - Columba McLaughlin May 2018 The very obvious corner gully immediately to the right of the start of Javelin Alternative. The gully separates the Prockagh wall from the main promontory cliff. Easy scrambling with very pleasant and easy bridging in the final section |
|||
| Fitzgerald Wall This small wall is North facing, and situated high on the cliff about 100m East of Stelfox Slab. The rock is sound, totally clean, has great friction, and all in the most spectacular of surroundings! Ideal for beginners. Access is either by abseil, or scramble down the spiky ridge at Gr 38791 59426 (also the approach to Malin Laundry West) about 100m further East. |
|||
Length: 10m Marty McGuigan, Alan Tees, 6/08/11 This short route starts just left of the chimney bounding the LHS of the wall, climb a right angled diedre, move right to avoid bulge, and finish up upper short diedre, to ledge.
|
|||
 HS 4a
HS 4aLength: 15m Geoff Thomas, Alan Tees Start just to the right of the chimney bounding the left end of the wall, and either go up the chimney, (or the groove to its right, and step left) to gain the bottom of a prominent deep crack. Climb the crack to a ledge, and continue up the arête above on good holds but no gear.
|
|||
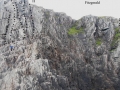 VD -
VD -Length: 10m Alan Tees, Geoff Thomas Takes the big overlapping crack bounding the right hand edge of thesteepest part of the wall.
|
|||
 VD -
VD -Length: 10m Alan Tees, Marty McGuigan, 6/08/11 Start 1m right of Sunning-Gael, and climb to gain arête, which is followed to the top.
|
|||
Length: 10m Alan Tees, Geoff Thomas About 3m right of “Sunning-Gael” climb juggy rock to gain obvious left trending diedre, and continue past chockstone to top.
|
|||
 D -
D -Length: 10m Alan Tees, 3/08/11 Just right of “Garret’s Groove” follow the obvious easy angled corner to where it stops at a short overhang, which is surmounted on it’s right on jugs, and continue upper corner to top. Delightful!
|
|||
 D -
D -Length: 10m Geoff Thomas, Alan Tees The next diedre right, just left of the arête, another great wee route for beginners!Just right of this is a fine area for scrambling, and then further right the "Headcase" routes, and Stelfox Slab.
|
|||
Length: 12m Trevor Hartley and Alfie Conn 14/10/2012 Start as for "Fine Gale" but after a few feet (or metres if you are European!) cross onto the right of the arete. Follow it to the small corner at the top.
|
|||
Length: 55m Alfie Conn and Trevor Hartley 14/10/2012 Start between "FitzGerald Wall" and "Malin Headcase" at the bottom of a long crack. This is just to the right of a broad gully scramble that leads to "Fitzgerald Wall"Follow it for 35m to a grassy belay below a small overhang. The crack (and route) continues left of this overhang.
|
|||
Crag Number: 171