Editor: Sail Rock | |
What would you like to do today? | |
| < | |
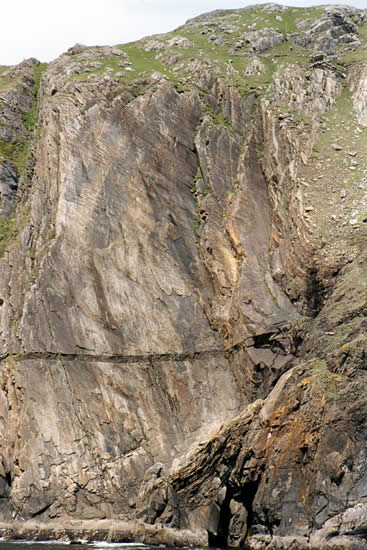
Crag Profile: Sail Rock |
|||
Details of the crag can be reviewed below. Editing links are present on all routes and inter-route notes |
|||
|
|
|||
Directions: A huge quartzite slab near Slieve League. OS Grid Reference: G558750 Click here to view location in Google Maps |
|||
01 - Roaring Forties
*
*
 VS 4c
VS 4cLength: 87m D Scott, R Gillies (4/67) VS.4c,4b,4c Start: This route takes the left edge of Sail Rock. The original line started up a crack to the right of the arete to reach the basalt dyke about 6m from the edge.
View Route Edit Route Upload a new photo for this route | |||
02 - Frigging in the Rigging
*
*
E5 6aLength: 80m T. Ryan, K MacDonald (8/92) E5.5c, 6a This climbs the superb slab midway between Roaring Forties and Main Mast. Start at the base of a long, straight crack directly above the apex of the blowhole.
View Route Edit Route Upload a new photo for this route | |||
03 - Westway To The World
Length: 70m Pat Nolan, Andy Long (alt.) May 2004 This route connects a series of subtle features between Main Mast and Friggin In The Riggin and is based on a peg of unknown origin at about 2/3 height which was used as a belay (in conjunction with abseil rope). (i)6b Start just right of the blow hole and climb easily rightwards to a break in the basalt dyke with a crack above which runs out. Climb the slabby wall above to reach a vague but conspicuous diagonal red/orange rounded overlap/wave. Use handholds in the overlap/bulge and traverse diagonally leftwards with feet on slab below to reach big crystal pockets (small/medium cams). Get feet in pockets and move rightwards to thin crack and wire placement (not obvious). Climb back left on face holds to reach bottom of short flake. Up this to hands-off ledge on left. Arrange cluster of microwires above ledge and make difficult face moves (crux) up wall to reach a flake/crack which leads to a small niche where the peg is. Belay -peg and abseil rope. (ii) 5b The first half of this pitch is unprotected. Climb the thin flake above the belay to where it ends. Traverse left across the wall to reach a hidden crack. Follow the crack, which gets easier with height, to the top. Finish just left of Main Mast. View Route Edit Route Upload a new photo for this route | |||
04 - Main Mast
 E2 5c
E2 5cLength: 69m D.Scott, R.Shaw, D.Nicol 08/67 Start: In the basin at the centre of the wall. The route takes the thin crack line right up the middle of the wall.
1) 15m From the shallow scoop ascend the broken cracks and slabs to the basalt dyke.
2) From the dyke follow the crack up steeply and diagonally left. Bridge up between flakes to a small stance.
3) The crack gradually narrows and the crack steepens, but the line of the crack is followed to the top. View Route Edit Route Upload a new photo for this route | |||
05 - European Bob
Length: 80m August 2003Pat Nolan, Joe Walls, This route follows a more or less direct line from just above the basalt dyke on Main Mast to the peg belay on Castaway. This is in effect a new direct first pitch to Castaway and finishes by the 2nd (crux) pitch of that route. From about 4m above the black band on Main Mast follow a thin crack rightwards through a small notched overlap. Continue on face holds when the crack runs out (many micro-wires). Thin moves gain a diagonal flake which is followed leftwards to large holds and the left side of an arching overlap (crucial F2 in crystal pocket down on L). With feet on large holds make thin moves up the left side of the overlap to reach sloping ramps leading to the peg belay on Castaway. Note: pegs cannot be reached from belay ledge. They are in good condition but in shallow placements. Pegs were extended on approach abseil to be easily clippable and the belay was backed up with the abseil rope. Finish via the top pitch of Castaway View Route Edit Route Upload a new photo for this route | |||
06 - Castaway
*
*
E6 6aLength: 80m D O'Sullivan, J Dugdale (8/91) E6.4c, 5a, 6a This takes the slab and thin crack right of Main Mast. The main pitch offers sustained climbing through areas of soft rock with `hopefully adequate protection'.
View Route Edit Route Upload a new photo for this route | |||
07 - Flying Dutchman
Length: 105m M Curran, P Blake (Alt leads) (6/67) Start: 15m right of Main Mast.
View Route Edit Route Upload a new photo for this route | |||
08 - Hulk
Length: 100m D Nicol, P Webster, D Scott (1967) Start: This route follows a line in the right-hand corner of the basin. It is rather loose and vegetated.
View Route Edit Route Upload a new photo for this route | |||